Preschoolers like to tear paper into shreds. Most parents think this is a bad habit and will prevent children from tearing paper. This seemingly simple tearing art project involves many skills. Children will enjoy the fun of creating art while practicing fine motor skills!
I have seen many children tear their parents' books to pieces at home, and they are finally taught by their parents. In fact, tearing paper is not deliberate by the children, because they don’t know what paper is important, they just want to find a more interesting way to play.
We have made a lot of craft projects, and they are a great way to make children learn excitedly. I like to make crafts with my son. When we work with children with special needs, we all make a lot of crafts. We all feel a little guilty about how much paper we use, so we save and reuse as much as possible. This tear-off art project uses paper scraps that we keep, rather than throwing away or recycling.
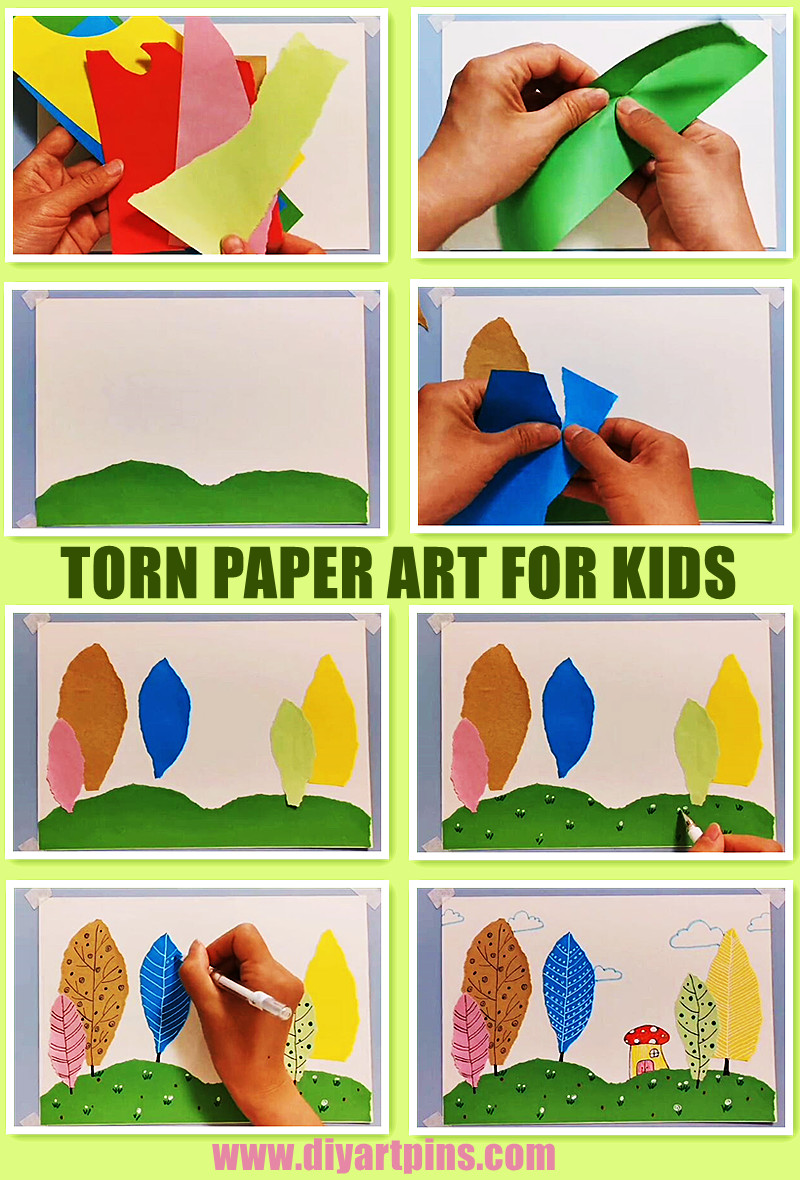
↓Torn paper painting of a rural landscape

More paper painting project ideas for you:
Hand torn paper tree paste painting
Seed art ideas for kids - Mushroom seed painting tutorial
How to make creative green leaf art paintings for kids?
Summer craft for kids - clay watermelon paste painting
Degree of difficulty:☆☆☆
Age:3-year-olds
Time-consuming:20+ minutes
supplies:
- papers
- glue
- pens
- markers
Notes before preparation of the torn paper painting a rural landscape
1.Children like paintings made of paper of different colors, so prepare some colored paper.
2.This work is not just a child’s craft project. Crafting will exercise the muscles of the hands and stimulate the children’s imagination.
3.Parents are the children's partners and their teachers. Give children the correct guidance in life.
How to make torn paper art projects for preschoolers in 5 easy steps
1.Prepare papers of different colors and tear them into pieces of different shapes.
2.Stick the green paper on the A4 paper as shown in Figure 3, just like a lawn.
3.Tear the paper of different colors into an oval shape, like a tree.
4.Tear the paper of different colors into an oval shape, like a tree. Paste these oval papers on A4 paper.
5.Finally, according to Figure 7-8, use colored pens to draw the branches of the trees, and draw a small house and clouds.
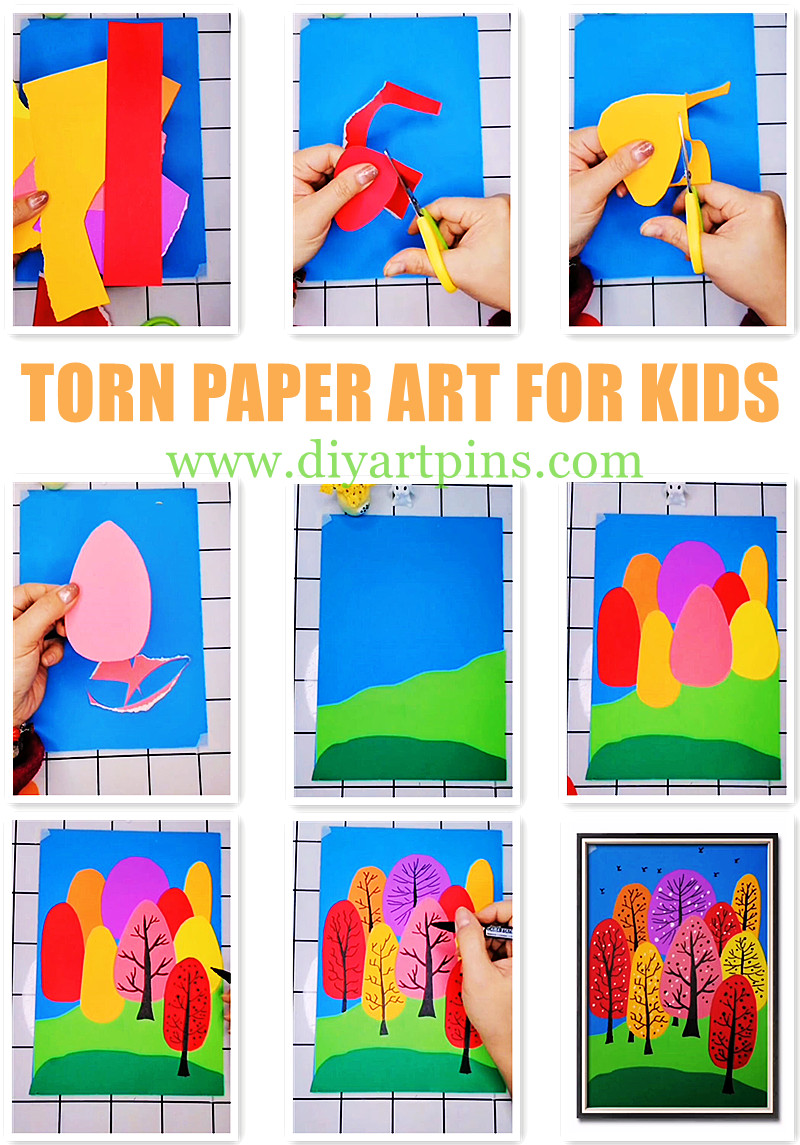
↓Torn paper painting of a forest

More papercraft ideas for you:
How to make a leaf painting from dead leaves?
How to make a paste painting from peanut shells?
Pineapple paste painting for children
Autumn leaf painting for children
Degree of difficulty:☆☆☆
Age:3-year-olds
Time-consuming:20+ minutes
supplies:
- papers
- glue
- pens
- markers
- scissors
Notes before preparation of the torn paper painting of a forest
1.Children like paintings made of paper of different colors, so prepare some colored paper.
2.This work is not just a child’s craft project. Crafting will exercise the muscles of the hands and stimulate the children’s imagination.
3.Scissors and glue may cause harm to preschoolers, so be careful of them.
4.Parents are the children's partners and their teachers. Give children the correct guidance in life.
How to make a torn paper painting of a forest in 3 easy steps
1.Tear colored paper of different colors into oval shapes, and trim the pieces of paper with scissors.
2.Paste the piece of paper on A4 blue paper as shown in Figure 5-6.
3.Then use the brush to draw the trunk and branches of the trees, and then draw some birds.


