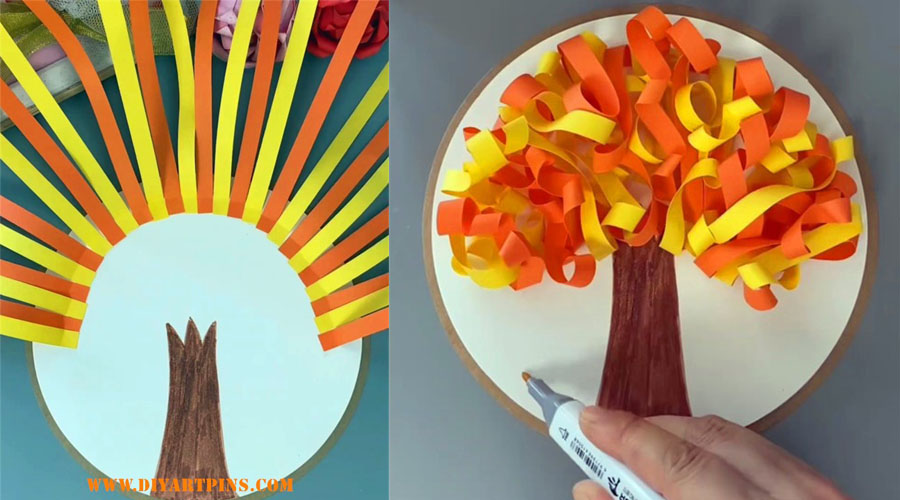
Fall is the season of harvest, when the leaves begin to turn yellow and gradually fall to the ground in anticipation of winter. If you're doing a craft project with your kids about fall, make a tree, the tutorial below is very easy and you can finish this one in 20 minutes.
What are some kids craft projects about fall?
1. Leaf collage
Materials: scissors, glue, cardboard, brushes, paints, etc.
Production method:
Children can go outside and collect fallen leaves of various shapes and colors.
Wash and flatten the leaves.
Use glue to stick the leaves onto cardboard to create various patterns such as animals, landscapes or abstract paintings.
Paintbrush scribbles can be added on or around the leaves to add interest and artistry to the work.
2. Leaf roses
Materials: maple leaves, thin string or tape.
Production method:
Pick some soft and hard maple leaves.
Roll a maple leaf from one side to the other to form the shape of a rose petal.
Stack multiple rolled maple leaf petals on top of each other and tie them tightly with thin string or tape to form a complete leaf rose.
You can make multiple leaf roses and combine them into a bouquet.
3. Twig dream net
Materials: dead tree branches, thin rope, scissors, glue, etc.
Production method:
Bundle dead tree branches together to form the frame of a dream net.
Use the string to weave a net-like structure on the frame.
You can intersperse found flowers, leaves, etc. into the rope as decoration.
Once the dream catching net is completed, it can be hung above the bed or by the window in the children's room to symbolize the retention of beautiful dreams.
A Paste Painting - Making a Fall Tree with Strips of Paper in 6 Steps
Degree of difficulty: ☆☆☆
Age: 4+ years old
Time-consuming: within 20 minutes
Supplies:
drawing paper
marker (loanword)
double-sided tape
Colorful paper strips

Step 1: On a round piece of drawing paper, draw the trunk section and fill it with color.

Step 2: Follow the method in the picture above and attach double-sided tape along the arc.

Step 3: After pasting the colored strips of paper in turn, then it's time to move on to the next step.
YOU ALSO MIGHT LIKE:
Rape blossoms flying bees paste painting
How to make a paste painting from peanut shells?
Hand torn paper tree paste painting
Rape blossoms flying bees paste painting
Summer craft for kids - clay watermelon paste painting

Step 4: Pull the strip of paper off and spin it around a few times before you start taping it to the top part of the trunk.

Step 5: After each strip of paper is manipulated in this way, the leaves look very lush and a fall tree is ready. Then use a marker to draw some weeds under the tree, doesn't it look better?

Step 6: Just like that a paper strip sticker painting about fall is ready, we can work with our kids and it's really fun to be completely done in less than 20 minutes.
Regularly making crafts with your children not only gives them a hands-on fall experience, but also fosters their creativity and imagination. At the same time, these works can also be used as decorations to add a touch of fall to the home or classroom.


